..................................................................Click on a photo to connect to my Flickr page to see more of my art! ............................................................................
Showing posts with label craft. Show all posts

Friday, January 18, 2013

How To Make A Square Border Using A Round Plate

Have you heard the saying, "You can't fit a square peg into a round hole"? Well, that may be true, but I am here to tell you that you can take a round plate and create a square or rectangle border. It's all in the chipping...

Many mosaic projects need borders, and plates are great for that because their edges are finished. I often use plates to border picture frames, mirrors, boxes, tables, and signs. I am currently working on a sign and I decided to take some photos and show you how I chipped up some plates to create a border for my sign. Below is a photo of the sign and some of the plates I used:


Here is a glimpse of what the border will look like (pre-grouted) after you follow the steps below:


Step 1
First chip your plate in half. I like to use wheeled nippers. They are more consistent than straight-edge nippers with the different densities of plates and china.


Step 2
Next, chip your halves in half, and those in half again, until you have pieces that are around 2 inches wide. Try to chip your pieces as straight as possible through the decorative edge to avoid harsh angles.


Step 3
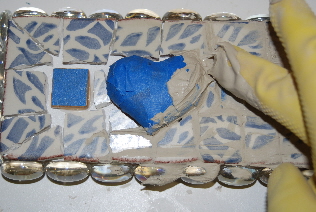
Now we need to chip off the decorative edge part from the rest of the plate. You want to use the flat part of the edge, so chip it off just before it starts to dip down to the center of the plate.

Step 4
After you chip up your plates you will use for your border you should have something like this to work with. We'll call these "edge pieces":

Step 5
Placing the pieces you have created along the edge of the sign is pretty straightforward. Just make sure they all are about the same length and width as each other. Also, if any do have slanted sides, chip them straight so you can place them close side-by-side along the edge of your sign. Using these edge pieces to create a corner is the tricky part (see 2nd photo from the top for an example of a corner). Corners are most successful if the edge pieces you use are square (the same width and length).  You will need two edge pieces that are square to create one corner. In the photo below, you see one of the edge pieces:
Step 6
Align your nippers to create an imaginary line from one corner to the opposite corner and then chip. You should have a nice obtuse triangle with pointed corners (the triangle with the finished edge is the one you will use. Discard or scrap the other):
Step 7
Place that piece so the finished edge is along the edge of your sign.
Step 8
Next, grab the other edge piece you set aside for this corner, and chip it along the opposite diagonal you chipped your first piece. For example, chip with finished edge facing to the right the first time and then the second piece, with the finished edge facing to the left when you chip along the diagonal. Your piece should fit in the spot like a puzzle piece. Make sure you have pointed corners on your triangles and as straight a cut as possible to ensure a close fit.


Here is what my sign looks like with a completed border:


A tip is to create your corners first and then put in the pieces along the edges. The reason for this is because, as I said in step 5, corners are most successful if they are square, but your edge pieces along the sides of your sign do not have to be square- they can be rectangular. You can have a rectangular corner, but one triangle will be long and obtuse and the other will be short and acute. If you look closely at my last photo here, the bottom left corner is a rectangle rather than a square and I had to get creative to make it look right. I think it adds character to my shabby chic-style sign.

In case you were wondering, along the sides of my sign I am placing 3/4" wide tile I recently bought at a discount building supply for $1 a sheet! And, I plan on filling in the rest of the top of the sign with white or something floral..not sure yet. If you want to see the finished product, check out my Flickr page (you can find a link just under my blog's main title) in a couple weeks...Thanks for reading, and, happy chipping!

Wednesday, October 17, 2012

How to...Make a Beautiful Mosaic Christmas Tree

For Crafters and Artists, Christmas projects have already begun! This project is fun, quick and fairly simple. What you need is:

Cardboard or styrofoam cone (mine was cardboard, 11" tall)
Fiberglass Mesh
Thinset mortar
A whole bunch of different small things to put on the tree (I used rocks, shells, beads, marbles, buttons, small ceramic figurines, jewelry, tiny Christmas ornaments)
large piece of paper
Q-tips
Water spray bottle


The first step is to cover your cardboard or styrofoam cone with a layer of thinset mortar on the fiberglass mesh. I simply cut out the fiberglass mesh to fit around the cone. Then I held onto the mesh around the cone with one hand while spreading on the thinset with the other hand. It "grabs" onto the mesh, which is on the cone, quite easily. Use your gloved fingers to smooth the thinset as best you can. Once the thinset is completely dry (24 hours), take a file and file all over the cone to smooth the surface. (The above photo shows the prepped cone). This gives you a solid base that will not only keep your tesserae on firmly, but strengthen the structure itself for a longer life.


   Take the large piece of paper and wrap it around the cone to get a fit. Trim off excess paper. Lay the cone "pattern" on your work table and use it to set up your tesserae, if you want to sort of plan out your design ahead of time. You could just stick stuff on to the tree without planning it out first, but I found I liked to move stuff around and try different things before I settled on what final design I wanted. Even with doing that, I still changed things a little when I was sticking things on.
   When you are ready, mix up a batch of white thinset mortar- mix a large batch- and generously smooth it on all over the cone. Try to get it between 1/8 and 1/4 inch thick. As you are placing things onto the cone, push them into the mortar. If you get excess mortar squishing out, gently scoop it off using a q-tip. For larger items, "butter" them on the back with  your extra thinset you made and then stick them on. It is important to keep your thinset moist as you are placing things onto the tree! Generously spritz your tree with water every few minutes.
   Another helpful tip: Place the cone up onto something while you are sticking things on. I put mine onto a shoe box just to elevate it enough so I could stick things on along the bottom easier, but also so I could spin the tree around without having to touch the tree itself.


The above photo is the finished product! If something happens to pop off after your thinset has dried you can simply glue it back on with either hot glue gun or Weldbond glue. This project is really two phases: 1) prep the cone with the 1st layer of thinset and mesh; 2) stick the tesserae on the cone with another layer of thinset. The first phase took about 30 minutes and then one day to dry, with another 10 minutes to file it smooth. The second phase took me about an hour and a half. So, all in all, this project is fairly quick and the results are stunning! I plan on making three more mosaic Christmas trees: a gold one, a red one, and a green one. Check out my Flickr link to see the finished products next month!

Friday, October 5, 2012

How To...Grout Without Staining Your Scrabble Tiles

Scrabble tiles are so popular to use amongst crafters and mosaic artists. They allow you, as the artist, to say something in your art. As a mosaic artist using grout, however, they can pose a problem as the wood sucks up the grout and becomes discolored. This month, I am posting a "how to" grout without staining your wood letter tiles. The answer is simple: cover each tile with blue painters tape before you grout!

For this blog post, I am including photos from a project I just completed. I wanted to make a little sign that said, "I [love] Chico" (Chico is my hometown). The heart I used on my sign is a painted styrofoam heart that I found at a yard sale. I needed to cover that as well so that the paint would not rub off the heart during the grouting process.
So, now that my pieces are covered, I can dive right in and grout just like I normally do. You do not need to avoid getting grout on the tape. The tape holds very well-- but not too well that it leaves residue behind when you want to take it off.

After the grouting is done, it's time to clean! I use my dry q-tips and clean off the excess grout. Sometimes I need to sort of "sculpt" or re-shape the grout here and there to porperly fill in all the spaces evenly and with clean lines, and to do that I use a wet q-tip (not too wet though- I usually dab it on a paper towel after dipping it in water). Then, once all the grout is cleaned off, you can peel off the painters tape. I use a toothpick to grab the corner of the tape up and then peel it off the rest of the way with my fingers.

The tape will lift some grout up here and there. If you need to, you can wet a q-tip and mash down and smooth out the grout along the edges, but do this carefully as it will get grout on the edges of your tiles. If you do get some grout on your wood letter tiles, you can take a q-tip and dip it in white vinegar, then dry it off a bit by dabbing it on a paper towel. Then clean off the wood tile with the vinegar. You may have to do it twice and you may still get some discoloration. I did not need to do any fixing of my grout after peeling off the blue painters tape. And my wood letter tiles looked just as clean as before I grouted!

And one final tip: If you notice my Scrabble tiles are blank besides the "O", it's because I did not have the letters I needed, so I simply used the back side. In the past I have then just painted on the letter and number onto each tile. But I am going to experiment with a wood burning tool to "write" on each letter. If you look at a Scrabble tile you will notice that the letter and number are sort of carved into the wood, rather than sitting directly on top. I want to try to match this look. If this works, I will write a blog about it and spread the word! Imagine...being able to use all those extra letter tiles like Q's,  X's and Z's, by flipping them over and making your own letter!