..................................................................Click on a photo to connect to my Flickr page to see more of my art! ............................................................................

Wednesday, May 8, 2013

How to Cut Stained Glass or...Why Am I Here?

 
     This is a blog post on how to cut stained glass using a scoring tool and running pliers. But it is also about something deeper than that. As I was working on transforming an old, wood window into a lovely piece of art (the above photo is one of the panes I completed), I began to see a correlation between stained glass and people. I know I am not the only artist to have thoughts such as these, as art is such a personal, emotional and spiritual experience. Plus, you have hours and hours to sit and think about things as you work. As you read along and gain step-by-step knowledge on scoring, breaking and fitting stained glass, may you also enjoy the encouraging insights God gave me through the process.
 
Materials   
 First, let's note the parameters of the project itself. I was working on filling in an abnormally shaped area using scraps of textured, clear glass. You can see the completed area in the first photo at the top of the blog post. I have several bins of scrap clear textured glass, as you can see here in the photo:

 
In my bins of glass I have smooth glass, bumpy glass, many different sizes and shapes of glass, shiny glass, opaque glass, unique, simple, very beautiful and plain glass. People are kind of the same aren't they? From a purely external point of view there are many different looking kinds of people. From an internal perspective, there are many different types, ability levels, personalities and temperments in people as well. As an artist, I value all the different kinds of stained glass I have. God loves and cherishes all His children- because He made each one! He doesn't make mistakes.
 
Bumpy and Iridescent- pretty!


Plain glass
Even the smallest pieces are important!
Beauty is in the detail.


Clean the Glass
When using stained glass, the first thing I like to do is clean each piece using a paper towel spritzed lightly with water. Then I use a dry towel to dry and buff the glass. After you've handled the glass your finger prints will be on it. You may want to clean it again before you glue it down. As I was cleaning my pieces, of which no two pieces are alike, I thought about how God offers us a way to cleanse us from guilt and wrong doings. The Bible says that when we believe Jesus is God the Son who came down as a man and died on a cross as a substitutionary sacrifice for peoples' sins, and then rose again three days later to join God in Heaven, and then, in response we turn our hearts and lives over to Him, He promises to cleanse us, forgive our sins and give us a brand new heart, and eternal life in Heaven with Him. In fact, there is no sin dirty enough that God can not forgive. No person is too far gone that God can not make new.


Clean the glass

Fitting the Glass into a specific spot
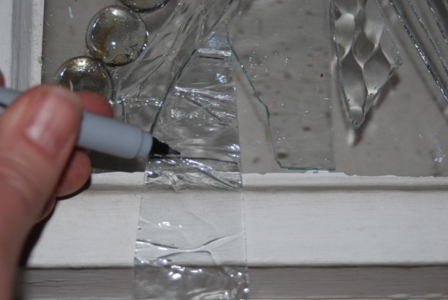
This blog post does not cover how to cut out curves in glass. Every cut I made was a straight line. In the photo below you can see that I had a piece of glass that was too long and I wanted to make it fit into that triangular-shaped spot. Holding the piece in the spot where I wanted it to go, I got my ultra-fine-tip Sharpie and drew a line right where I would need to cut. Next, I scored the glass. If you don't know what that means, basically it means you cut through the top layer of glass using a special cutter that has a tiny, very sharp cutting wheel- kind of like a tiny, very sharp pizza slicer. Then, when you apply pressure along the score, much like a fault line in the earth, the glass will split right along that line. Running pliers are the tool you use to apply the pressure to split the glass. After that process, you will have the right piece of glass for the space you wanted!
      This step made me think about how God will sometimes need to cut things out of our lives or hearts so we can better fit into the work of art He has us in. It can sometimes seem unpleasant or we may not see the purpose in it at first, but if we trust Him, then we will reap the rewards of becoming more as He intended for us to be.
       See the photos below for more details on how to score and use running pliers.

Test out where you want the piece to go.

Ultra fine-tip Sharpie

Score along the line you drew with your Sharpie.
Don't begin or end your score on the very edges- you can chip the glass.
Press down and pull the small score wheel across the glass and you will
hear it make sort of a scratching sound as it scores. 

Running pliers have a little notch mark that you line up with
your score line. Make sure you have enough glass sticking out
on either side of the mouth of the pliers or else you may break
your glass to pieces. If you want to cut a skinny piece, you will
use something like needle-nose pliers to "pop off" your skinny piece
along the score. Running pliers are for pieces that are a bit wider.
Place the pliers about a 1/4 inch into the glass and use even pressure
to squeeze the handles together.

Now my piece fits right where I wanted it to go!

By the way, Sharpie comes off simply with a damp cloth or
damp q-tip and a little rubbing.

Odds and Ends
Glass on the garage floor
   At one point in working on my project I accidentally flung a piece of glass because my scorer slipped off the edge of the glass, causing it to shoot out like a jumping frog. The glass broke into several pieces once it hit the ground. I picked up all the pieces because I could still use them. Sometimes we, as people, go through something very difficult and may feel broken. The Bible says that God is near the broken-hearted and that Jesus, like a good shepherd, will leave the flock of sheep to go out to find that one, lost and broken sheep to bring it back with the others. None of us are left as trash.


I appreciate you, the reader, who stayed with this post the entire length of it. It was important for me, as a person, to share this information about God and the things He showed me, because it is of so much value to me. Blogs are a unique form of communication in that they convey information but they also come from an individual who has opinions, values and beliefs. Thank you for allowing me to share these truths with you. I hope you found encouragement from this post, as well as learned something about mosaic art technique!

If you want to look up any of the verses in the Bible that support the things I've said here in my post then here they are (I like the New Living Translation of the Bible because it is easier to understand):
1 John 1:9
1 Corinthians 15:3-4
2 Corinthians 3:16-18
John 3:15-17
Matthew 18:11-14
Psalm 34:18
Psalms 139 (the whole chapter)


Wednesday, April 17, 2013

How to...Do Glass-on-Glass Mosaic in One Day


   Spring is here in sunny California and making a beautiful light-catching mosaic to hang in the window just seemed like the right thing to do! I have had several people ask me how to make glass-on-glass mosaic. It's pretty simple! The glue to use is Weldbond because it dries clear. Here is how I made what you see here!

You will need: (links lead you to a website where you can purchase one if you need to- just trying to make it easier for you!)
All Glass Picture Frame (preferably with a pre-drilled hole in the top)
Stained Glass
Weldbond Glue
Paper and pencil
Sharpie Ultra-fine-tip pen
Paper towels, Q-tips, tweezers
Glass scorer and Running Pliers
Glass wheeled nippers

Step 1: Choose a Picture Frame
Choose a picture frame! I found an all glass 5 x 7 frame with a hole already drilled in the top. AND it was only $1 at our local Dollar Tree Store. Try to find a frame that does not have any wood on it. Solid glass will capture more light. If you find an all glass frame but it does not have a hole drilled in it already, you can try to drill your own (check out this WikiHow) or you can try those stick-on (click to buy from Amazon) picture hanging hooks. Make sure you follow the weight suggestions.


Step 2: Concept
Now it's time to decide what you will mosaic! I would suggest drawing out on a piece of paper what you want to mosaic. You can make your sketch very precise and then tape it underneath the glass so you can follow the lines when you are placing your stained glass. Think "color-by-number". OR you can just come up with a general concept and then go from there. That is what I did. I decided I wanted to do a flower-type, and, as you can see, this was just a general idea and I took it from there. Here is my lovely sketch:
 I would say, in general, a no-fail design for a light-catching mosaic would be something that has to do with light and nature (like the sun, or trees, or flowers....). 
 
Step 3: Lay out your pieces
Then I got my bucket of stained-glass scraps (see photo below) and just began putting a puzzle together with the pieces. I did need to chip and score here or there to make things fit into place. TIP: Use a fine-tip Sharpie pen to draw on your stained glass where you want to cut, then cut or chip along your line. The Sharpie will rub right off with a damp paper towel or Q-tip. If you didn't sketch out precisely what colors go where, I do recommend laying out all the pieces first before gluing any down. The reason for this is so you can make changes in regards to color. Because this is a light-catcher, color is a big deal. If you notice in the photo of my completed project, I was careful to balance the dark blues with the lighter blues.
[By the way, you can maybe get free stained glass scraps by contacting a local stained glass artist and seeing if they will give you their scraps. Try contacting your local art center for names of local stained glass artists. That's how I got mine!]
 
Don't bump your piece!
 
 
Step 4: Glue
Once all your pieces are laid out, then begin to glue each one down one at a time. Tweezers can help to pry or pick up your pieces. Paint or dab on some Weldbond glue (click the link to see where you can buy some). You can spread the glue evenly and thinly (not so thin that you can see through the glass still) or you can just dab some on. Press the piece firmly back into place. Some glue may squish out on the sides. If so much glue squishes out that the glue-squish is as high as the top of the stained glass, then you should remove the piece, wipe some glue off and then put it back (I said "squish" 3 times- well make that 4).
 
Step 5: Let it Dry
Weldbond glue takes anywhere from 24 hours to over a week to completely dry with glass-on-glass. But you can hang your piece up after 24 hours. The stained glass pieces will not slide down after that length of time. To hang it, you can either screw in a hook screw up on the inside top of your window- into that wall part. Then use fishing line and loop it through the hole and then tie it and hang it on the hook. Or, you can use those sticky hangers and stick it directly on your window, although you will be able to see them through your stained glass a little- unless you can find clear ones! However you choose to display your mosaic light-catcher, be sure to put it in a sunny spot!


Wednesday, March 20, 2013

Art Touches the Soul

Wall at Marigold Elementary school- artist Meredith Timpson
   
     One of the things I struggled with when I was first coming to the realization and decision that I was "an artist", was the question of, "What good will any of this bring?" I wanted to know that all the time and energy I was putting into my pieces was going to result in something other than lack of sleep or being a garage hermit. (My mosaic studio is in the garage. I spend a lot of time in the garage.) Peace and assurance came to me one day when I noticed just how much I am affected when I see a piece of art that reaches my soul. When I see a piece of art whose textures and colors are richly varied, unexpected, and come together with a sort of harmony that was always meant to be, there is a moment when my heart skips a beat, my breath is taken if but briefly, and I am reminded once again of the beauty found in this life. For me, many mosaics, some oil paintings, certain watercolor paintings, and all sunsets (artist's name: God) move me in that way. When I am reminded of beauty, I commune once again with the Maker of beauty, and, for me, that brings me back to my place of rest. Art is a big deal.
    I have been immensely humbled a few times by being on the artist-end of the soul-touched viewer of one of my mosaics. You can see it when someone is moved by a piece. They linger. They study intensely as if they couldn't believe their eyes. Sometimes they talk outloud to themselves and yet, it is as if they are having this conversation with the piece itself. Almost like the art understands who they are as a person and they have just made a new soul-mate. I know it has nothing to do with me. Yeah, I made it. But 100 people before that person walked right past that piece and did not react that way. The planet has 7 billion people, all uniquely different. It is a good thing there are so many artists creating so many different kinds of art because not one of those 7 billion people are identical. More art means more people will have a chance to find beauty, comfort, inspiration, and healing.
   My mother is an artist and I can use her as an example to make my point beautifully. My mother, Linda Smith ( http://www.lindacsmithfineart.com/ ) is also a mosaic artist (and painter, sculpter, writer, photographer, cook, green-thumb....the amazing list goes on). She was asked to do a commission of two large mosaics for the ICU floor of a new hospital wing in the Bay Area in California. Some months after the installation she received an email from a man who had had a family member in the ICU there at that hospital. It seems that during the time he spent pacing the floor waiting for word on his family member who was in the ICU, he had noticed her mosaics. In particular he stopped in front of one titled "End of Day". Here is what he said in his email to her:

"…I was immediately taken in and felt such an amazing sense of peace rush over me. It was perfect timing. The colors and the depth of the tiles were so captivating and I couldn't stop staring at all the individual details of the piece…." 

  The man was moved. His soul was touched and the art helped him to have peace during a stressful time in his life. Of course my mother was touched. I interviewed her for this blog and she shared her response to what this man had told her,

"My response to this person's email was an emotional thing for me! I've always thought that if my artistic work helps just one person to see the wonders of the colors and immensity of 'Life' then I've done my job. I'm also a person of faith and believe that the work I do is what God means for me to do…to share the colors and wonders of Life through my art."

Now you want to see her work don't ya! A little about the pieces first: They are both 30 inches in diameter and were made using hand-glazed Morrocan tile imported to the US through  http://www.tinytilemosaics.com/ . But here's the thing. The tiles she used range in size from 1/2 inch square at the largest down to 1/8 inch. They are tiny. But the effect they create is breathtaking. Think "painting" with tile. Think "pointelism" with tile. I've included photos and descriptions of both her pieces at the bottom. Perhaps you will be moved as well.

Art touches the soul. Does art touch everyone's soul? I actually believe that for every person alive there is a piece of art that would speak to them specifically. Some people don't look at art or seek it out. Some people, like the man at the hospital, come across it during their lives. Just think- if Linda would not have made those pieces, someone else's art may have hung in that spot and may not have spoken to that man's soul the way her art did. When I create my art now, not only am I grateful for my own bond with the piece, but I think about the people that will see it and hope that someone else connects with it and is made happier because of it. And my number one highlight would be if the beauty of my work caused someone to contemplate the Source of beauty and be brought to of God. To me, that is a worthy purpose.

 "Rise of Day"  The design gives the hope of a new day dawning. Every day the sun rises on our planet and the promise of each new day is yet to be written. -Linda Smith
 

"End of Day" This design gives comfort. Whether the day has been long and difficult or short and sweet, the setting of the sun indicates that the gathering darkness will fall as a warm blanket giving comfort through the night until the sun rises again. -Linda Smith


Monday, February 11, 2013

How to Promote Yourself Locally As An Artist

     We create. Art is born. Then what? As an artist, we have some choices to make. We can decorate our own homes from top to bottom with our creations. We can give our art away to everyone we know as gifts. We can store our artwork in the garage, or...we can get it "out there". The truth is, that being an artist can involve the need to know how to market yourself and your work, if you wish your art to be viewed and bought by the public. Now, I did not earn a marketing degree in college. I would venture to say that many, if not most, artists do not have a marketing degree or much marketing experience... at first. In this month's blog, I am going to share how I have gotten my name and my art out into my community. Perhaps you may try some of these things in your community!

In a nutshell here is what I suggest:
1. Join your local community art center or group (or the one in the nearest town to you if yours does not have one)
2. Enter art shows and go to art shows
3. See if you can show and/or sell your work in local businesses
4. Teach art classes in your medium through community rec programs or your art center.
5. Have business cards, a social networking account dedicated to your art, and a blog!


#1
Join your local community art center.
Check out my local art center to see what one has to offer, at
www.chicoartcenter.com
Being a member of the Chico Art Center has provided me with many opportunities to get my name and my art out there. I have been in art shows held through the Art Center. I teach mosaic classes through the Art Center. I have run the kids craft booth during our Friday night concert-in-the-park program during the summer. I have done art demonstrations at the art center during special art awareness nights. Because I have made connections with the people who work and volunteer at the art center, they think of me when a local business or organization is looking for an artist to come and do a demonstration or to hang their art in their local business. I have also been featured in our group's email newsletter. Join your local art center because it is one of the best ways to get your name known as an artist in your community.
 
#2
Be in an art show! I am going to be
in this outdoor art show in May.
http://chivaa.org/art-fiesta/
I remember the first art show I entered I was so nervous because I did not feel like an artist. I felt like I had no business entering my art alongside all these local pros! There are two kinds of art shows: Shows where you pay and you're in, and Shows where you send in your money and photos of your work, and then are either invited or rejected. This second kind of art show is known as a juried show. My local art center has a members show every January. If you are a member you can have a piece shown in a bonafied art show! This is the place to start. Entering a piece of art in juried shows can be a gamble because they almost always cost money (usually $20-$40) and you may not even get your piece in the show. You do not get your money back if they do not accept you. I most certainly have been rejected for multiple art shows, but that doesn't discourage me from trying again. I usually set a yearly goal to be in two or three art shows where you pay and you're in, and one or two juried art show attempts. One major reason I enter art shows, besides to try to sell my art, is to motivate me to finish an art piece. There are deadlines for entering shows and these deadlines help me finish pieces that perhaps otherwise would've sat for weeks (ok-months). I also recommend going to art shows even if you are not showing work in it. You can meet other artists and often, through talking with others at art shows, can discover opportunities and relationships that will help you promote your own art! This is called "networking" (those of you who are experienced in all this are rolling your eyes now...).
 
#3
Sell or show your art in local businesses
http://www.madeinchicostore.com/
My town has a wonderful, amazing store called Made in Chico. Everything for sale in the store was made by someone in Chico. Local artists and artisans consign their creations here. I have had great success selling my mosaic creations here over the years. Not every town has such a store. You may have to go out and create your own opportunity. Go to a local florist or locally owned home decor shop and see if the owner/manager would be willing to sell some of your pieces on consignment. A fair consignment deal would be that they get one-third of the retail selling price and you get two-thirds. If you can not find anyone who wants to do a consignment deal, perhaps a local doctors office or restaurant will show one or several of your pieces for a period of time. Perhaps they could display your art near the receptionist or hostess desk, or in the waiting room or main dining area. This benefits you because you can have a nameplate with contact information  and sale information on it below each artwork, and it benefits the local business because customers enjoy local art and will think favorably of the business that they, too, appreciate and support local arts.
 
#4
Teach an art class in your medium.
Check out my local rec program's art class listings:
http://www.chicorec.com/Classes/Art/index.html
I am a teacher by nature. As a young girl I would come home from school and teach my younger sister what I learned in school that day. I have a music education degree and teach music. So, teaching, for me, is natural. Teaching, for you, may be far from natural. That does not mean you should not do it! Perhaps you can team up with a friend or an experienced teacher and begin by offering a one day workshop in something very basic in your medium. Or you can teach a children's class in some form of your medium. For example, I taught a one day mosaic workshop for children and we did a mosaic using glass gem drops. The students did not have to use nippers or tweezers or deal with sharp edges. They just glued on smooth, round glass drops and then we grouted. It was great! And, by doing that class, my name was out there. These places like my local CARD, and the Chico Art Center I mentioned in #1, publicize their classes and people will see your name. The more places you have your name mentioned as an artist, the more credibility it gives you in the eye of the public as an artist. Any students that come to your class will meet you and recommend you (hopefully!) to their friends. Offer deals like, "bring a friend and save $5". This will help even more people come to your class and then get to know you as an artist.
 
#5
           
Use social media to help locals learn more about you as an artist.
Check out my Facebook page to see an example:
https://www.facebook.com/#!/KimFinlanMosaics
Here is my business card.
Get free business cards at
www.vistaprint.com
Get business cards so you can hand them out to anyone you talk to about your art. People love receiving an artist's business card. You can get free business cards (you pay for shipping) at www.vistaprint.com . You can also use social media to promote your art. I have a Facebook page. I make sure I post something about mosaics at least once a week. I post photos of works I am doing, I post links to cool mosaic blogs, I post art show openings. I even post about thrift store finds like dishes I will break up and mosaic with. With a Facebook page (different than just a regular FB account), you can have fans or "Likes" and whenever you post it'll show up on their Facebook. Then, it is possible that your post can spread to hundreds of other people as your fans share your posts with their friends. Usually, most of your Facebook friends are locals, and your friends' friends are locals. I recommend getting a FB page if you are an artist. Another great tool for getting your name out their as an artist? A blog! Hey- you're reading my blog aren't ya? ;)
 
  I am definitely not an expert in how to promote yourself as an artist, but these five things have helped me become known in my community as an artist. I believe they can help you too!  


Friday, January 18, 2013

How To Make A Square Border Using A Round Plate

Have you heard the saying, "You can't fit a square peg into a round hole"? Well, that may be true, but I am here to tell you that you can take a round plate and create a square or rectangle border. It's all in the chipping...

Many mosaic projects need borders, and plates are great for that because their edges are finished. I often use plates to border picture frames, mirrors, boxes, tables, and signs. I am currently working on a sign and I decided to take some photos and show you how I chipped up some plates to create a border for my sign. Below is a photo of the sign and some of the plates I used:


Here is a glimpse of what the border will look like (pre-grouted) after you follow the steps below:


Step 1
First chip your plate in half. I like to use wheeled nippers. They are more consistent than straight-edge nippers with the different densities of plates and china.


Step 2
Next, chip your halves in half, and those in half again, until you have pieces that are around 2 inches wide. Try to chip your pieces as straight as possible through the decorative edge to avoid harsh angles.


Step 3
Now we need to chip off the decorative edge part from the rest of the plate. You want to use the flat part of the edge, so chip it off just before it starts to dip down to the center of the plate.

Step 4
After you chip up your plates you will use for your border you should have something like this to work with. We'll call these "edge pieces":

Step 5
Placing the pieces you have created along the edge of the sign is pretty straightforward. Just make sure they all are about the same length and width as each other. Also, if any do have slanted sides, chip them straight so you can place them close side-by-side along the edge of your sign. Using these edge pieces to create a corner is the tricky part (see 2nd photo from the top for an example of a corner). Corners are most successful if the edge pieces you use are square (the same width and length).  You will need two edge pieces that are square to create one corner. In the photo below, you see one of the edge pieces:
Step 6
Align your nippers to create an imaginary line from one corner to the opposite corner and then chip. You should have a nice obtuse triangle with pointed corners (the triangle with the finished edge is the one you will use. Discard or scrap the other):
Step 7
Place that piece so the finished edge is along the edge of your sign.
Step 8
Next, grab the other edge piece you set aside for this corner, and chip it along the opposite diagonal you chipped your first piece. For example, chip with finished edge facing to the right the first time and then the second piece, with the finished edge facing to the left when you chip along the diagonal. Your piece should fit in the spot like a puzzle piece. Make sure you have pointed corners on your triangles and as straight a cut as possible to ensure a close fit.


Here is what my sign looks like with a completed border:


A tip is to create your corners first and then put in the pieces along the edges. The reason for this is because, as I said in step 5, corners are most successful if they are square, but your edge pieces along the sides of your sign do not have to be square- they can be rectangular. You can have a rectangular corner, but one triangle will be long and obtuse and the other will be short and acute. If you look closely at my last photo here, the bottom left corner is a rectangle rather than a square and I had to get creative to make it look right. I think it adds character to my shabby chic-style sign.

In case you were wondering, along the sides of my sign I am placing 3/4" wide tile I recently bought at a discount building supply for $1 a sheet! And, I plan on filling in the rest of the top of the sign with white or something floral..not sure yet. If you want to see the finished product, check out my Flickr page (you can find a link just under my blog's main title) in a couple weeks...Thanks for reading, and, happy chipping!